
60–90 Day House Prep Checklist for Sellers: Cleanout Timing, Paperwork
Prepare to list in 60–90 days. This checklist shows when to hire a cleanout crew and how to document repairs to avoid closing delays.

60–90 Day House Prep Checklist for Sellers: Cleanout Timing, Paperwork
Start preparing 60 to 90 days before your planned listing date, and put three tasks at the top of the list: a pre-listing inspection, a full declutter and deep clean, and curb appeal fixes. Everything else on your checklist branches off those three. Sequencing matters more than most sellers realize. Fix the house before you stage it, and stage it before the photographer shows up.
TL;DR:
- Repairs for safety and structural issues should be completed at least six to eight weeks before listing to avoid rework after staging or painting.
- Decluttering, deep cleaning, and neutral repainting are most effective four to six weeks before photos, ensuring the house looks fresh and well-maintained.
- Exterior upgrades like landscaping, power washing, and fixing damage should be done within the 4 to 6 weeks window, focusing on high-impact, low-cost improvements.
- Conducting a pre-listing inspection early, at a cost of $300 to $600, helps identify issues that could otherwise delay or complicate negotiations later.
- For properties with extensive clutter, professional cleanout crews can clear spaces faster than DIY efforts, often within the initial 8 to 12 week planning window.
Table of Contents
- Preparing a House for Sale Checklist: The Master Timeline
- Interior Prep Checklist: Room-by-Room Priorities
- Curb Appeal Checklist: What Buyers Notice First
- Inspections, Repairs, and Cost Planning
- Paperwork and Disclosures: Build the Buyer Document Package
- Preparing for Showings and Open Houses
- When to Hire a Professional Cleanout Crew
- Setting a Realistic Budget for Preparation Tasks
- Tips for Effective Communication With Real Estate Agents During Preparation
- Safety Considerations During Preparation Work
- How to Manage Temporary Living Arrangements During Extensive Prep
- When Speed Matters More Than Perfection
- Get Listing-Ready Faster With a Professional Cleanout
- Checklists Worth Bookmarking
- Sources
- FAQ
Preparing a House for Sale Checklist: The Master Timeline
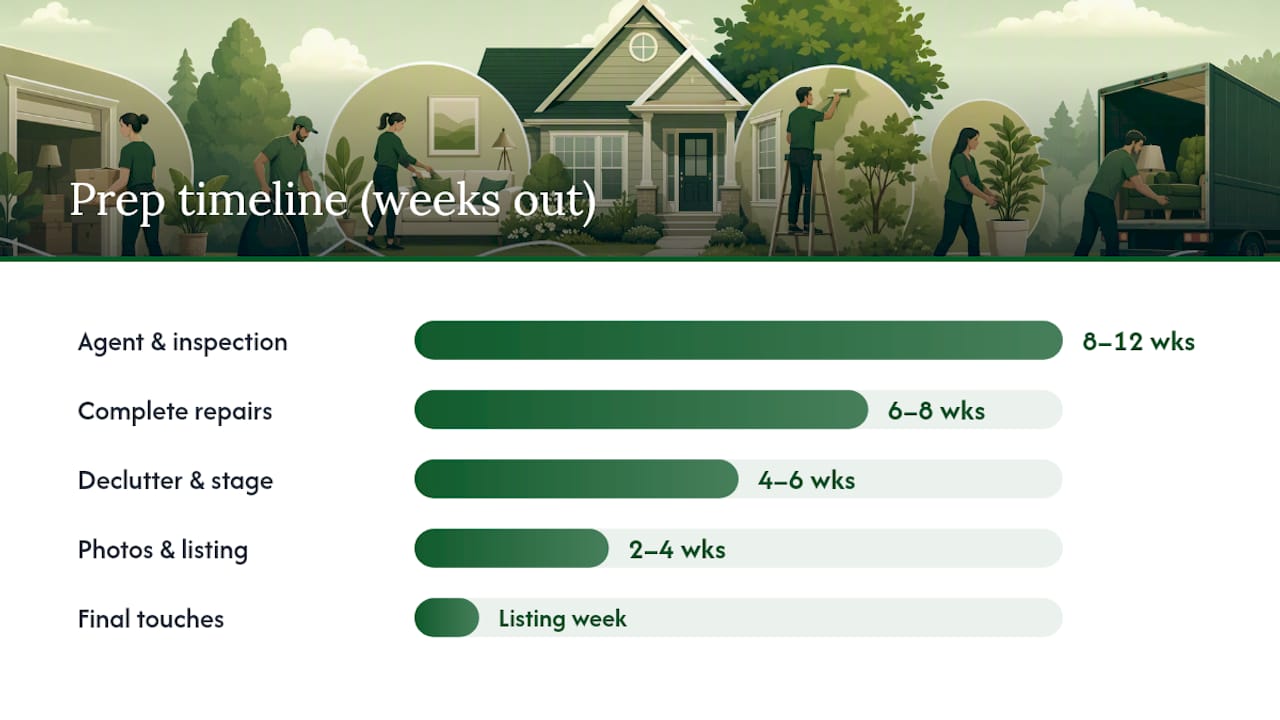
Working backward from your listing date keeps you from scrambling in the final week, and it prevents the single most common prep mistake: painting or staging a room before a repair tears it back apart. Zillow’s seller guidance recommends starting major prep 60 to 90 days out, with structural and repair work happening first and cosmetic work landing closer to the photo shoot.
Here’s how that breaks down in practice:
- 8 to 12 weeks out: Interview and hire your agent, schedule a pre-listing inspection, and collect repair or replacement estimates for anything the inspection flags.
- 6 to 8 weeks out: Complete the repairs you prioritized, especially anything with a drying or curing period, like fresh drywall, new grout, or exterior paint.
- 4 to 6 weeks out: Declutter room by room, deep clean the whole house, repaint walls in neutral tones, and set up staging.
- 2 to 4 weeks out: Book professional photography and finalize listing copy and marketing materials with your agent.
- Listing week: Handle final touches, lock up valuables and prescription medications, and confirm your showing availability and pet plan.
A pro tip worth repeating from real estate handouts: repairs come before staging, and staging comes before photos, never the reverse order. Sellers who paint and stage first often end up repainting a wall after a plumber or electrician has to tear into it. That’s wasted money and a wasted weekend.
If your prep list includes clearing out a garage, basement, or storage unit full of years of accumulated stuff, build that into your 8 to 12 week window. Cleanouts take longer than people expect, especially if you’re sorting through what to keep, donate, or haul away.
Interior Prep Checklist: Room-by-Room Priorities
Buyers form an opinion within seconds of walking through your front door, and interior presentation is where most of that opinion gets made. Realtor breaks this down into decluttering, depersonalizing, neutral paint, small repairs, and deep cleaning, plus one-step sellers often skip: an honest smell test.
Work through the house by zone rather than trying to tackle everything at once:
- Closets and storage: Pack up enough that shelves and closets look 30% to 50% empty. Buyers open closets, and stuffed ones read as “not enough storage” even when the house has plenty.
- Kitchen: Clear every countertop except one or two intentional items, wipe down the inside of the oven and refrigerator, organize the pantry, and tighten or replace worn cabinet hardware.
- Bathrooms: Scrub grout lines, polish faucets and mirrors, and re-caulk around tubs and sinks if the existing caulk is yellowed or cracked.
- Floors and surfaces: Steam-clean carpets, buff out scuff marks on hardwood or trim, and replace any burned-out light bulbs, including closets and under-cabinet fixtures.
- Depersonalize: Pack away family photos, religious items, and strongly personal décor. Buyers need to picture their own life in the space, not yours.
- Staging priorities: If you only stage three rooms, make them the living room, kitchen, and primary bedroom. Those are the images buyers linger on longest in online listings.
Pro Tip: Do the smell test after you’ve been out of the house for a few hours, not right after cleaning. Pet odor, cooking smells, and musty basements are invisible to people who live with them every day but immediately obvious to a buyer walking in cold.
A quick DIY staging move that costs almost nothing: swap heavy drapes for sheer or open window treatments to flood rooms with natural light, and remove one piece of furniture from any room that feels tight. Buyers consistently read more light and more floor space as more value.
Curb Appeal Checklist: What Buyers Notice First
Before a buyer ever steps inside, they’ve already formed a judgment from the driveway, and often from the listing photo before that. Landscaping and front-entry upgrades are among the cheapest, highest-return moves you can make, according to Zillow’s prep guidance, because small exterior investments create an outsized first impression relative to their cost.
Focus your time and budget on these areas:
- Lawn, beds, and color: Mow, edge, pull weeds, refresh mulch, and add a few pots of seasonal flowers near the entry.
- Surface cleaning: Power wash siding, the driveway, and walkways, and clear leaves and debris from gutters.
- Entry upgrades: Repaint or clean the front door, polish or replace tarnished hardware, and confirm house numbers and porch lighting actually work.
- Critical repairs: Fix torn window screens and address any visible roof shingles or siding damage before photos, since these read as deferred maintenance to buyers.
For most of this list, a weekend and a rented power washer will get you there. Where it makes sense to bring in help is anything involving ladders, roof access, or heavy yard debris. A landscaper can turn an overgrown bed around in an afternoon, and if your prep uncovers old fencing, a dead shed, or years of yard waste, a debris hauling crew clears it faster than most homeowners can manage solo.
Inspections, Repairs, and Cost Planning
A pre-listing inspection typically runs a few hundred dollars, and it’s one of the highest-leverage moves in your entire prep budget. Zillow’s guidance puts typical costs around $300 to $600, and the payoff is straightforward: you find problems on your own timeline instead of during a buyer’s inspection, when they become negotiating leverage against you.
Prioritize repairs in this order:
- Safety and structural issues first (electrical, foundation, roof leaks)
- Visible maintenance problems next (HVAC performance, plumbing leaks, window seals)
- Cosmetic fixes last (paint touch-ups, hardware, minor scuffs)
Before you commit to any big-ticket repair or replacement, get estimates for the roof, HVAC system, water heater, and major appliances so you know real numbers, not guesses, when buyers or their inspectors raise questions.
Not every upgrade is worth doing. Full kitchen remodels, high-end landscaping overhauls, and swimming pools rarely recoup their full cost at resale, and NAR’s pre-listing checklist points sellers toward lower-cost, higher-impact fixes instead: cleaning, minor repairs, and curb appeal. Whatever you do fix, keep the receipts and take before-and-after photos. That documentation becomes useful leverage during buyer negotiations and answers disclosure questions before they turn into delays.
Paperwork and Disclosures: Build the Buyer Document Package
Buyers and their lenders expect a specific set of documents at offer time, and having them ready ahead of the listing prevents last-minute scrambling. Opendoor’s seller guidance recommends assembling this package early rather than hunting for paperwork mid-negotiation.
Gather these before you list:
- Appliance manuals and warranty documents
- Service records for HVAC, plumbing, and roofing
- Permit history for any additions or major renovations
- Recent utility bills and property tax statements
- HOA documents, if applicable, and any known neighborhood details worth disclosing
If you’ve lost the original paperwork, most manufacturers and contractors can reissue records or confirmations on request. Document known issues and past repairs honestly in your disclosure. Sellers who show up organized typically face fewer extension requests and close faster, according to Opendoor’s findings.
Preparing for Showings and Open Houses
Once the house is listed, your prep work shifts from one-time projects to a repeatable show-day routine.
- Turn on all interior lights, open blinds, and set the thermostat to a comfortable temperature before any showing.
- Clear counters, hide personal items and valuables, and remove pets from the property during visits.
- Coordinate photography timing with your agent, since golden-hour light or bright midday shots tend to photograph best depending on the home’s orientation.
- Confirm lockbox access, your showing window schedule, and where you’ll be while buyers walk through.
Small touches like fresh towels in the bathroom and a bouquet on the kitchen counter cost almost nothing and consistently register with buyers walking through a staged home.
When to Hire a Professional Cleanout Crew
Some prep jobs outgrow a weekend. If you’re facing a garage, basement, or storage area with more than a truckload of stuff, an estate settlement on a tight timeline, or safety hazards like broken glass or old chemicals, it’s worth calling in a cleanout crew instead of losing a month to it yourself.
- Professional cleanouts typically cover furniture and appliance removal, debris hauling, and donation routing for usable items.
- Most companies quote from photos, so you get a number before committing to a date.
- Pro Tip: Ask for the estimate before you start moving things yourself. Volume and access change the price more than most homeowners expect.
Setting a Realistic Budget for Preparation Tasks
Most sellers underestimate prep costs by focusing only on the big items and forgetting the accumulation of small ones. A realistic budget separates spending into three buckets: mandatory repairs identified by your inspection, cosmetic refresh items like paint and cleaning, and optional upgrades you can skip if money is tight.
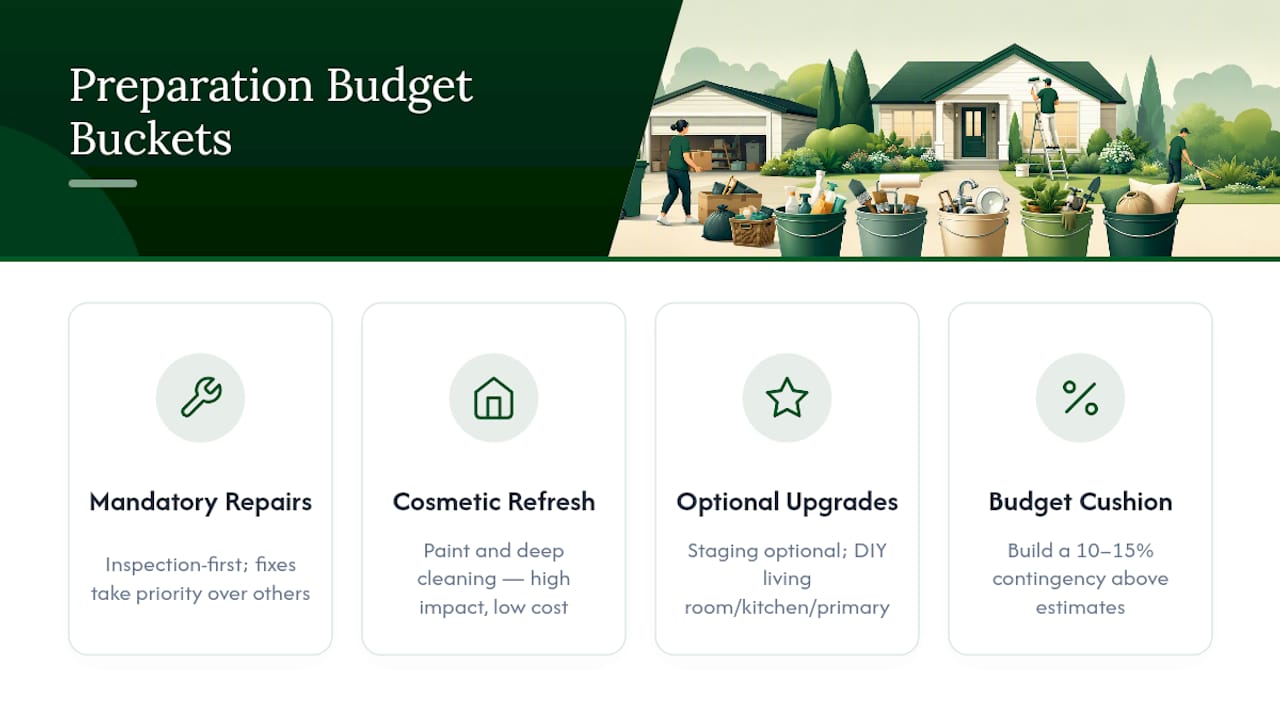
Start with the inspection results, since that’s the one expense that determines everything downstream. If it turns up a failing water heater or roof issues, that repair budget takes priority over new paint or professional staging. Build in a cushion of 10% to 15% above your initial estimates. Contractors find things once walls open up, and “while we’re at it” costs have a way of appearing on every home project.
For cosmetic work, a gallon of neutral paint runs far less than most sellers assume, and deep cleaning services are typically the cheapest line item relative to their impact on how buyers perceive the whole house. Professional staging costs more but isn’t mandatory. Focusing DIY staging effort on the living room, kitchen, and primary bedroom gets most of the benefit at a fraction of full-service staging fees.
If your budget is genuinely tight, spend on the pre-listing inspection and basic cleaning first. Those two items protect you from the costliest outcome: a buyer’s inspector finding something you missed and using it to renegotiate your price after you’ve already accepted an offer.
Tips for Effective Communication With Real Estate Agents During Preparation
Your agent has seen hundreds of homes go through this exact process, and the sellers who get the smoothest results are the ones who loop their agent in early rather than presenting a finished house and asking for feedback afterward.
Share your inspection report with your agent as soon as you get it. They can tell you which flagged items buyers in your local market will actually care about versus which ones rarely come up in negotiations. Agents also track what’s currently selling in your price range and neighborhood, so ask directly: “What are buyers responding to in similar listings right now?” That local market research often reshapes your repair and staging priorities more than any generic checklist can.
Set a communication rhythm before prep work starts. Weekly check-ins during the 60 to 90 day window keep both of you aligned on what’s done, what’s pending, and whether the timeline still points toward your target listing date. If a contractor delay pushes your painting back a week, tell your agent immediately. They may need to adjust the marketing timeline or photography date to match.
Be equally direct about budget constraints. An agent who knows you’re not doing a full kitchen remodel can help you find the two or three fixes that matter most within what you’re willing to spend, rather than assuming you’ll tackle everything on a generic list.
Safety Considerations During Preparation Work
Prep work involves more physical risk than most sellers plan for, especially when repairs stack up in a short window. Ladder falls during gutter cleaning and roof inspections are among the most common home-project injuries, so if a job requires getting on the roof or working above the second rung of a ladder, hire it out rather than risk it solo.
Watch for hazards that accumulate in homes prepping for sale, particularly older properties. Basements and garages often store paint cans, solvents, pesticides, and other chemicals that need proper disposal rather than a trash bag. Attics and crawl spaces can hide mold, rodent activity, or asbestos-containing materials in homes built before the 1980s. If a pre-listing inspection flags any of these, get a specialist’s assessment before you or a contractor disturbs the material.
Keep the work area contained if you have kids or pets in the house during active projects. Paint fumes need ventilation, power tools need supervision zones, and any demolition debris, drywall dust, nails, or splintered wood, should get cleared daily rather than left as a tripping hazard overnight. If you’re clearing out heavy items like old appliances or furniture, lifting injuries are common enough that a debris removal service is often cheaper than a trip to urgent care.
How to Manage Temporary Living Arrangements During Extensive Prep
If your prep list includes flooring replacement, major painting, or anything that makes parts of the house unlivable, decide early whether you’re staying put or need to relocate temporarily. Living in a house mid-renovation is workable for small projects but genuinely disruptive for anything involving dust, fumes, or shut-off utilities for more than a day or two.
For short projects, staying with family or in a budget extended-stay rental for a few nights is usually more practical than trying to coordinate contractors around your daily schedule. For longer prep windows, especially estate situations where you’re also clearing out a family member’s belongings, some sellers find it easier to move out entirely and manage the property remotely during the final weeks before listing. That approach also makes showings simpler, since there’s no need to coordinate around your own occupancy.
Whatever you decide, tell your agent your availability constraints upfront. If you’re not living in the house during the listing period, they’ll need a clear plan for lockbox access, utilities staying on for showings, and who handles last-minute tidying between visits.
When Speed Matters More Than Perfection
Not every seller has 90 days. If your timeline is tight, skip the cosmetic upgrades and put every dollar into the pre-listing inspection and a genuine declutter. Sellers who chase full staging on a compressed schedule often run out of time for the repairs that actually affect price. A cleanout crew compresses the biggest bottleneck: clearing years of accumulated stuff in days instead of weekends.
— Olga
Get Listing-Ready Faster With a Professional Cleanout
If your prep list includes a garage, basement, or storage area that’s grown out of control, clearing it yourself can eat weeks you don’t have before listing. Professional cleanout crews offer a faster alternative to tackling that cleanout solo. Such crews typically handle full property cleanouts, estate cleanouts, and debris hauling across Central Indiana communities, and route usable items to local donation partners instead of sending everything to the landfill.
Getting started is simple: send us photos of the space, and we’ll give you a quote without a home visit, which keeps things moving on your timeline. Most jobs get scheduled fast, which matters when your listing date is already set. If you’re staring down a basement full of decades of belongings or an estate that needs to be cleared before it can go on the market, check out our full property cleanout services or explore everything we offer and request your free estimate today.
Checklists Worth Bookmarking
For deeper reference alongside this guide, NAR’s pre-listing checklist covers inspection and paperwork basics, PA Realtors’ seller guide organizes tasks by curb appeal and repairs, and for interior fix-up ideas beyond paint and cleaning, One Day Doors & Closets covers small carpentry upgrades that freshen tired rooms.
Sources
- Before Putting a Home Up For Sale
- How to Get Your House Ready to Sell
- Staging tips and interior checklist
- How to prepare your house for sale
FAQ
What Is the 3-3-3 Rule for Buying a House?
The 3-3-3 rule is a budgeting guideline for buyers, not sellers: spend no more than three times your annual income on a home, keep a mortgage payment under three weeks of pay, and hold three months of expenses in savings after closing. It’s worth understanding since your buyers are likely calculating against it too.
What Is the Hardest Month to Sell a House?
Winter months, particularly December and January, typically see the slowest buyer activity in most markets due to holidays and cold weather. If your timeline allows flexibility, listing in spring or early summer generally puts your home in front of more active buyers.
What Should You Not Fix Before Selling a House?
Skip full kitchen or bathroom remodels, high-end landscaping overhauls, and other big-ticket upgrades that rarely recoup their full cost at resale. Focus your budget instead on the pre-listing inspection, cleaning, decluttering, and curb appeal, which consistently deliver better returns for the money.
What Are the Top Things to Do Before Listing a House?
Start with a pre-listing inspection, then declutter and deep clean every room, depersonalize, repaint in neutral tones, boost curb appeal, complete priority repairs, and gather your paperwork, including warranties, permits, and utility bills. If the cleanout portion feels bigger than a weekend project, a pre-listing cleanout service can compress that step significantly.
How Far in Advance Should I Start Preparing My House for Sale?
Most sellers should start 60 to 90 days before their target listing date, prioritizing inspection and repairs first, then decluttering and staging closer to when photography happens.