
Document Items Before Disposal: An Executor's Checklist
Learn the essential steps to document items before disposal. Capture photos, create logs, and protect valuables to avoid future disputes.

Document Items Before Disposal: An Executor’s Checklist
Before anything leaves the property, capture wide-room photos of every space, close-up shots of notable items, and a written log of what each one is, where it lived, and what condition it was in. Secure jewelry, cash, firearms, and locked safes immediately and back up every photo and file before a single box gets loaded. Photographing the whole property before moving or disposal creates a visual record that protects you from disputes later.
- Wide-room shots first, close-ups of notable items second
- One inventory row per notable item: description, room, condition
- Secure and log jewelry, cash, firearms, and safes before anything else
- Finish and back up documentation before disposal, ideally 7–10 days before the cleanout crew arrives
Key Takeaways
Documenting items before disposal requires photographing every room, logging item details in a shared spreadsheet, securing valuables first, and backing up files before any removal begins.
| Point | Details |
|---|---|
| Photograph before moving anything | Wide-room shots first, close-ups of notable items and marks second. |
| Secure high-value items immediately | Jewelry, cash, firearms, and safes get logged and locked away before the walkthrough continues. |
| Build one shared inventory file | Use a spreadsheet with room, condition, value, proof, and disposition columns linked to photo filenames. |
| Get appraisals selectively | Reserve professional appraisals for jewelry, art, and collections; use photo estimates for everyday goods. |
| Back up everything the same day | Store photos, video, and spreadsheets in a shared cloud folder, not a single device. |
| Book the cleanout after documentation | Ohanapropertyexperts recommends scheduling removal 7 to 10 days after your inventory and photos are complete. |
Table of Contents
- How Do You Document Items Before Disposal, Room by Room?
- What’s the Best Way to Photograph Items for Documentation?
- What Should an Inventory Spreadsheet Include?
- When Do You Need a Professional Appraisal Instead of a Photo Estimate?
- How Do You Secure Valuables and Record Chain of Custody?
- What Should You Do the Week Before the Cleanout Crew Arrives?
- How Do You Document Items With Video for Extra Coverage?
- How Should You Label and Tag Items Physically?
- What Legal and Privacy Issues Come Up When Documenting Possessions?
- How Do You Verify Your Inventory Is Accurate Before Disposal?
- What’s the Best Way to Back Up Inventory Files Securely?
- How Do You Document Shared or Communal Property Fairly?
- Get Help Finishing the Job Once Documentation Is Done
- A Note From Olga
- Frequently Asked Questions
- Sources
How Do You Document Items Before Disposal, Room by Room?
A single walkthrough, done in order, gives you a complete photographic and written record without wasting a day on it. Move through the property the same way each time: wide shots first, then close-ups, then the drawers and closets people forget.
- Start at the front door and work clockwise. Take one wide-angle photo per room before touching anything.
- Open every closet, cabinet, and drawer. Photograph the contents before you decide what stays.
- Photograph notable items individually. Furniture, electronics, jewelry, tools, and anything with a maker’s mark or serial number gets its own close-up.
- Group everyday items instead of itemizing them. A dresser full of folded linens is one line item (“linens, dresser #2, fair condition”), not twenty.
- Itemize anything with resale or sentimental value. Silverware sets, artwork, collectibles, and family heirlooms each need their own row and photo.
- Assign a disposition to every row as you go. Use a simple tag: keep, assign to an heir, sell, donate, or dispose.
- Flag anything uncertain for appraisal. If you don’t know what it’s worth, mark it and move on. Don’t stall the walkthrough guessing.
A room-by-room photographic baseline reduces disputes later, especially among heirs or co-owners who weren’t present for the walkthrough.
Realistic pace: most single-family homes take from one to two hours per room when the room is full, and about a quarter of an hour for a lightly furnished bedroom or bathroom. A house of normal size with typical clutter usually requires several hours total.
Call in extra hands once you’re past four rooms with dense storage. Basements, garages, and attics eat time fast because everything in them needs opening, sorting, and photographing before you know what you’re looking at.
What’s the Best Way to Photograph Items for Documentation?
Photos only work as proof if someone unfamiliar with the house can look at them later and know exactly what they’re seeing. That means context first, detail second, every time.
- Shoot a wide-angle photo of the room before moving anything, so the “before” state is on record
- Follow with close-ups of maker’s marks, serial numbers, model plates, and any existing damage
- Name files by room and item code (example: “livingroom_03_chair.jpg”) so photos sort themselves
- Keep original files untouched. Preserve their EXIF timestamp data rather than screenshotting or editing them
- Back up originals to a cloud folder the same day you shoot them, not at the end of the project
- Add a ruler or coin for scale on smaller collectibles, coins, or jewelry pieces
- Photograph serial numbers and hallmarks straight on, in good light, with no flare or shadow across the numbers
For each meaningful item, capture one clear whole-object photo plus close-ups of maker marks or serial numbers, then log the plain facts next to it: what it is, where it was found, its condition, and a rough value estimate.
Pro Tip: Shoot in daylight near a window whenever possible. Overhead room lighting throws shadows across engravings and serial plates, and that’s exactly where disputes happen later.
What Should an Inventory Spreadsheet Include?
You don’t need special software. A shared spreadsheet with the right columns does the job, and it’s something every family member or co-executor can open without a login or a learning curve.
| Column | Purpose |
|---|---|
| Room/Location | Where the item was found |
| Item description | Plain-language name and details |
| Type | Category (furniture, jewelry, electronics, etc.) |
| Photo filename | Links the row to its photo |
| Condition | New, good, fair, damaged |
| Estimated value | Rough dollar range or “unverified” |
| Proof | Receipt, appraisal, or “photo only” |
| Disposition | Keep, assign, sell, donate, dispose |
- Group ordinary household goods into single rows to save time; itemize anything with resale or sentimental weight
- Store photos in folders named by room, matching your file naming convention
- Back the whole file up to a shared cloud drive so no single laptop is the only copy
- Example row: “Kitchen | KitchenAid stand mixer | Appliance | kitchen_04_mixer.jpg | Good | $180 | Photo only | Sell”
When Do You Need a Professional Appraisal Instead of a Photo Estimate?
Most household items only need a photo and a fair-market guess. Some don’t, and guessing wrong on those can cost heirs real money at tax time or during probate.
- Get a professional appraisal for fine jewelry, firearms, art, antiques, and collections with likely resale value over a few hundred dollars
- Use photo-based estimates for furniture, appliances, and everyday goods where comparable listings set the price
- Save every appraisal report, receipt, and comparable listing directly inside the estate file next to the matching inventory row
- Mark anything without paperwork as “informal estimate” with the date it was assessed, so nobody mistakes a guess for a certified value
Executors who keep valuation evidence, whether photo-based or a full appraisal, saved with the inventory give heirs a defensible tax basis and give probate courts a transparent paper trail. When there’s no paperwork for something that looks valuable, log it as unverified and pending professional appraisal rather than assigning it a number you can’t back up.
How Do You Secure Valuables and Record Chain of Custody?
Locked safes and hidden valuables create the most risk of any part of a cleanout, and the fix is procedural, not complicated.
- Don’t force open a locked safe or cabinet. Photograph it in place, note the location, and log it as “locked, pending access”
- Open it with a bonded locksmith present, ideally with a second witness or a video recording of the process
- Remove small valuables (jewelry, cash, documents) and place them in a labeled, secure container the same day
- Get a signed, dated receipt any time an item changes hands between family members, an executor, or a service provider
- Executors should hold everything until formal clearance. Don’t distribute or dispose of anything before that.
Pro Tip: Photograph the safe’s contents laid out on a table before you divide anything up. It’s the single fastest way to head off a later “where did that go” conversation.
What Should You Do the Week Before the Cleanout Crew Arrives?
The final week before removal day is where documentation either holds up or falls apart. Scheduling a cleanout at least 7 to 10 days out once you know the scope gives you the buffer to finish this properly.
- Finish and back up the full inventory at least 7 to 10 days before the scheduled date.
- Physically label or rope off anything that should not be removed, and leave written disposition instructions with the crew supervisor.
- Request a written confirmation or manifest for anything going to donation or disposal, so you have a record of where it went.
- Take a second round of photos after the crew finishes, room by room, matching your original walkthrough angles.
- Walk the property with the crew lead before sign-off, checking retained items against your list and confirming nothing flagged as “keep” left the building.
Ohanapropertyexperts crews work directly from a client’s disposition instructions, which is exactly why a completed inventory before the job starts saves everyone a headache.
How Do You Document Items With Video for Extra Coverage?
Photos capture a moment. Video captures context, and that difference matters when an item’s condition or placement might get questioned later. A slow walkthrough video, shot room by room right before disposal, shows adjacency and scale that individual photos miss. Was that antique dresser actually sitting where the family remembers it? Video answers that in a way a single photo can’t.
Record a continuous walkthrough narrating out loud as you go, naming the room and calling out anything of note. Say the date on camera at the start. Most phone cameras embed a timestamp automatically, but narrating it out loud gives you a second layer of proof if metadata ever gets stripped by a file transfer or app.
Use video specifically for high-value finds and safe openings. If you’re opening a locked safe with a locksmith present, record the entire process from the moment the door swings open to the moment contents are laid out. That single video, saved alongside your still photos, is often the strongest piece of documentation in the whole estate file.
Keep video files in the same cloud folder as your photos, named by room and date. Don’t rely on your phone’s local storage alone. A cracked screen or a lost phone shouldn’t mean losing the only record of what was in the house.
How Should You Label and Tag Items Physically?
Digital documentation only works if it matches what’s actually sitting in the room. A spreadsheet row that says “dresser, item code LR03” is useless if nothing in the living room carries that code.
Use small adhesive tags or painter’s tape labeled with the same item code from your spreadsheet, and stick one on every itemized piece before the crew arrives. Color-code by disposition instead of writing it out. Green for keep, yellow for donate, red for dispose works faster than reading labels one at a time under time pressure.
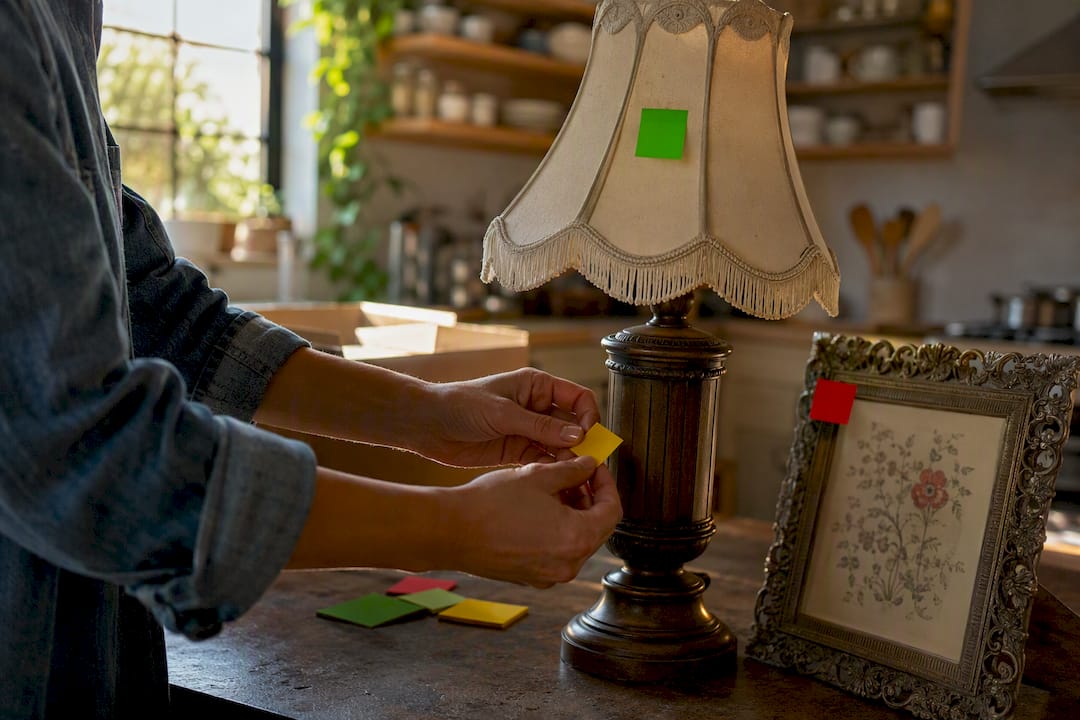
For items assigned to specific heirs, write the recipient’s initials directly on the tag along with the item code. This heads off exactly the kind of “I thought that was going to me” conversation that turns cleanouts into family disputes. Tag boxes of grouped everyday items the same way you tagged their spreadsheet row, so movers or crew members can match a box to a disposition without asking anyone.
Keep a roll of masking tape and a permanent marker in your walkthrough kit alongside your phone. It sounds basic, but running out of tags halfway through a garage full of tools is a common, avoidable delay.
What Legal and Privacy Issues Come Up When Documenting Possessions?
Documentation gets legally sensitive fast when the property involves a tenant, a shared household, or an estate with multiple heirs. If you’re a landlord or property manager clearing a rental, tenants generally retain rights to their personal property even after a lease ends, and improperly disposing of a former tenant’s belongings can expose you to liability. Check your state’s specific notice and storage requirements before treating anything left behind as abandoned.
For estate executors, the inventory itself can become a legal document once probate opens. Courts and co-heirs may request to see it, so accuracy matters more than speed. Avoid photographing or logging personal correspondence, medical records, or financial documents in the same public-facing inventory file used for physical items. Route sensitive paperwork to a separate, restricted folder rather than mixing it with photos of furniture and appliances.
Privacy also matters when other family members or heirs are present during the walkthrough. Get verbal agreement before photographing items someone else considers personal, particularly in a shared household where ownership isn’t clear-cut. A quick conversation up front avoids a much longer one later.
How Do You Verify Your Inventory Is Accurate Before Disposal?
Before you sign off on any documentation and let a crew start hauling, cross-check the inventory against the property itself one more time. This second pass is where errors surface, not the first walkthrough.
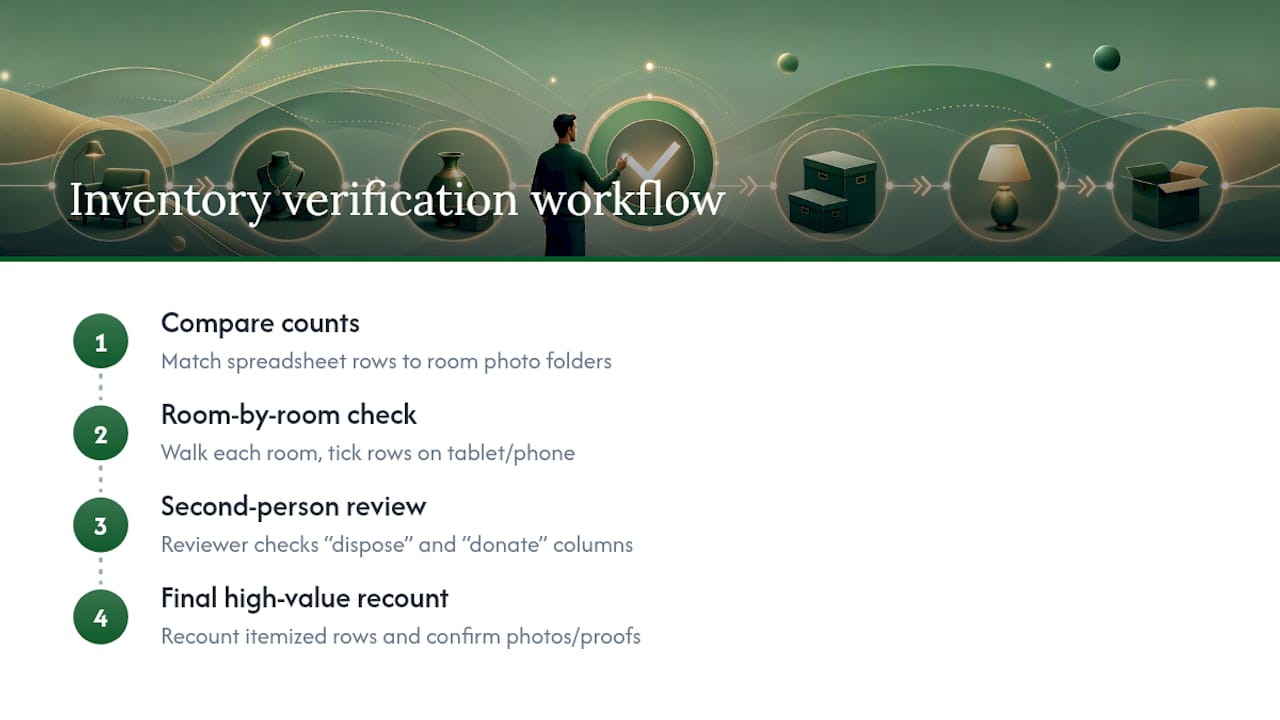
Compare your spreadsheet row count against the number of photos in each room folder. A mismatch usually means a skipped item or an unlabeled photo, and it’s faster to catch that now than after the truck leaves. Walk each room a second time with the spreadsheet open on a tablet or phone, checking off rows as you confirm the item is still where you logged it.
Have a second person, a co-executor, family member, or even the cleanout crew supervisor, review the “dispose” and “donate” columns specifically. These are the categories most likely to trigger regret or disagreement later, and a second set of eyes catches mistakes before they become permanent.
Recount high-value and itemized rows against their photos and proof documents last. If a jewelry piece or appraised item is missing its close-up photo or proof attachment, resolve it before the crew arrives rather than after.
What’s the Best Way to Back Up Inventory Files Securely?
An inventory that only exists on one phone or laptop is one dropped device away from being useless. Store your working spreadsheet and photo folders in a cloud service like Google Drive, Dropbox, or iCloud, and share edit access with at least one co-executor or family member so the file isn’t a single point of failure.
Set up automatic photo backup on your phone before you start the walkthrough, not after. Most phones offer this natively, and it means every photo uploads the moment it’s taken rather than waiting for you to remember at the end of a long day.
Export a static PDF or spreadsheet copy of the inventory at each major milestone, after the initial walkthrough, after valuations come back, and again right before disposal. Email that PDF to yourself and any co-executor so there’s a dated snapshot outside the live, editable file. If a mistake ever gets made in the working spreadsheet, you have a clean version to check against.
How Do You Document Shared or Communal Property Fairly?
Shared property, whether it’s a jointly owned home, a multi-heir estate, or a household with roommates, is where documentation prevents the most conflict. The fix is transparency, not speed.
Photograph and log shared items with every stakeholder’s knowledge, ideally with more than one person present for the walkthrough of common areas. If that’s not possible, share photos and inventory rows as you complete them rather than presenting a finished list after the fact. A zone-based approach, classifying rooms by density and type of belongings, works especially well here because it gives every party a clear, neutral basis for how items got prioritized rather than one person’s subjective call.
For items with disputed ownership, use a “disputed, pending agreement” disposition tag instead of guessing. Don’t assign or dispose of anything in that category until the parties involved agree in writing, even if it’s just a text message thread confirming the decision. That single habit prevents most of the disputes that turn a routine cleanout into a family conflict.
Get Help Finishing the Job Once Documentation Is Done
Once your inventory is photographed, logged, and backed up, the actual removal is where things either go smoothly or turn into another week of stress. Ohanapropertyexperts is a family-owned option for Central Indiana homeowners, estate executors, and property managers who need the physical cleanout handled by people who already understand what a documented handoff looks like.
Ohana Property & Transition Services handles estate cleanouts, full property cleanouts, appliance and furniture removal, and debris hauling across Columbus, Seymour, North Vernon, Franklin, Greenwood, Indianapolis, and the surrounding Central Indiana area. Quotes are photo-based, so send your room photos and disposition spreadsheet ahead of time and expect a fast, accurate estimate without a walkthrough appointment first. Donation-conscious recovery means items tagged “donate” in your inventory actually get routed to local organizations instead of a landfill. Review the full list of cleanout and removal services, or request a free estimate for an estate cleanout today by calling (812) 302-6833 or submitting your photos online.
A Note From Olga
Estate documentation feels enormous until you start. If time is short, photograph and log your 20 most meaningful items first. Everything else can follow. Reach out anytime. Our crews serve these communities because we live here too.
Frequently Asked Questions
Why should you document items before disposal instead of just starting the cleanout?
A completed inventory protects heirs, tenants, and owners from disputes over what existed in the property and where it went. It also supports probate transparency and gives you a defensible tax basis for anything sold or donated.
What’s the minimum documentation needed if time is limited?
Wide-room photos of every space, close-up shots of your 20 most valuable or meaningful items, and a basic spreadsheet row for each. Secure jewelry, cash, and firearms first regardless of time pressure.
How long should you keep inventory records after a cleanout?
Retain dated photos, spreadsheets, valuation reports, and receipts for several years after the estate closes, since probate or tax questions can surface well after the property is cleared.
Do you need a professional appraisal for every valuable-looking item?
No. Reserve formal appraisals for fine jewelry, firearms, art, and collections likely worth more than a few hundred dollars. Everyday furniture and appliances only need a photo and a fair market estimate.
How far in advance should you book a cleanout crew after finishing your inventory?
Most cleanout providers, including Ohanapropertyexperts, recommend booking 7 to 10 days after your documentation is complete, giving you time to finalize disposition decisions before the crew arrives.
Sources
- How to Inventory a Home for Estate Planning | Heriteo
- How to Value an Estate for Probate: Executor’s Guide | Estimonia
Recommended
- How to Sort Deceased Belongings Legally in Indiana | Ohana Property Services
- How to Identify Valuable Estate Items: A Step-by-Step Guide | Ohana Property Services
- How to Coordinate an Estate Sale Cleanout Efficiently | Ohana Property Services
- What to Do With a Parent’s Belongings After They Pass | Ohana Property Services